Multi-Layer Neural Network의 실전: XOR Gate 만들어보기 (Python)
03 Jan 2019본 포스트에서는 NumPy만을 이용하여 Multi-Layer Neural Network 기반 Learned XOR Gate를 만들어 볼 것이다.
이에 대한 이론적 배경은 지난 포스트를 참조!
복습: XOR Gate란?
XOR Gate 의 input(\(x_i\))과 ouput(\(y_i\))은 다음과 같다.
| \(i\) | \(x_{i}=(x_{0i}, x_{1i})\) | \(y_{i}\) |
|---|---|---|
| \(0\) | \((0,0)\) | \(0\) |
| \(1\) | \((0,1)\) | \(1\) |
| \(2\) | \((1,0)\) | \(1\) |
| \(3\) | \((1,1)\) | \(0\) |
모델 구조
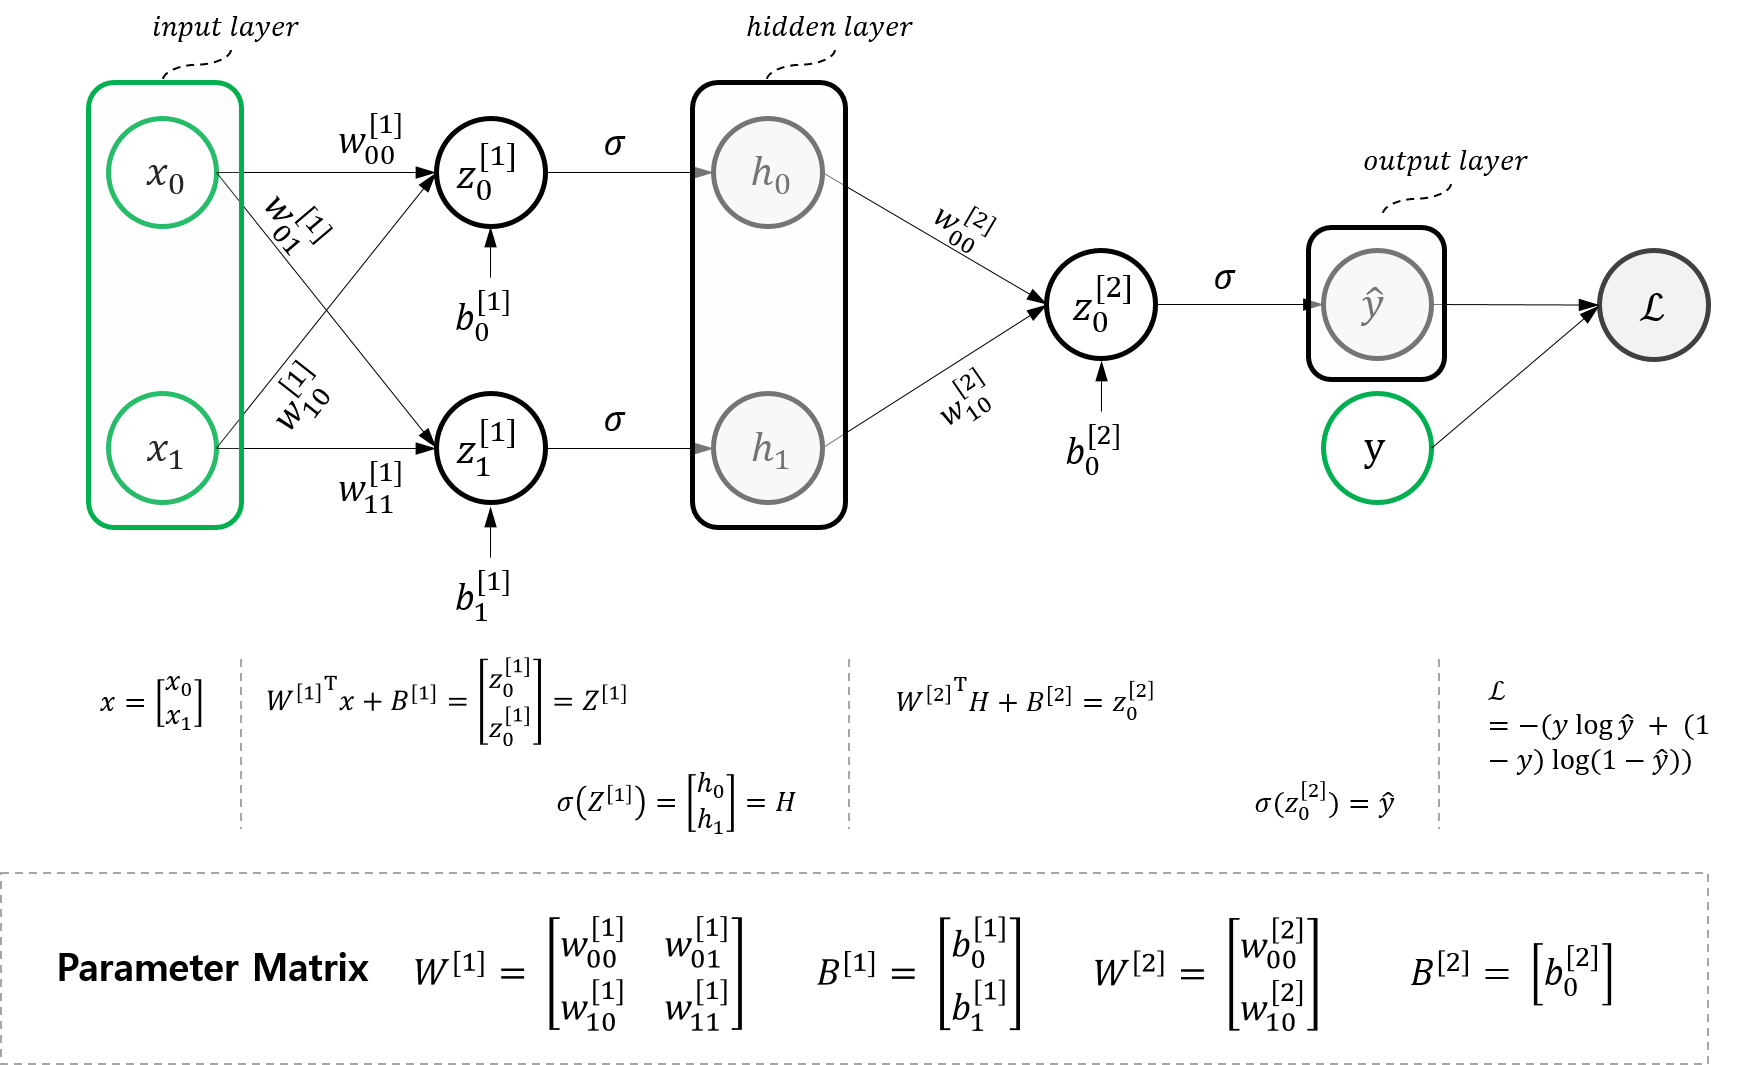
XOR Gate 학습을 위한 MLNN(Multi-Layer Neural Network) 모델은 Multi-Layer-Neural Network 이론편에서 다루었으며, 해당 포스트에서 그 이론을 자세히 다루었으니 필요한 사람은 참조!

본 포스트에서는 이론편에서 소개한 행렬 수식을 전개하되, :Advanced: 행렬(Matrix) 연산으로 바꾸기에서 소개한 Notation을 이용하여 4개의 데이터 인스턴스에 대한 식을 전개한다.
1. Input Layer
먼저 인풋 레이어인 데이터 셋부터 다음과 같이 행렬 형태로 나타내보자.
\[X = \begin{bmatrix} x_{0} & x_{1} & x_{2} & x_{3} \end{bmatrix} = \begin{bmatrix} x_{00} & x_{01} & x_{02} & x_{03} \\ x_{10} & x_{11} & x_{12} & x_{13} \\ \end{bmatrix} = \begin{bmatrix} 0 & 0 & 1 & 1 \\ 0 & 1 & 0 & 1 \\ \end{bmatrix}\]2. Hidden Layer
Hidden Layer는 다음과 같이 정의된다.
\[\begin{aligned} H &= \begin{bmatrix} h_{00} & h_{01} & h_{02} & h_{03} \\ h_{10} & h_{11} & h_{12} & h_{13} \end{bmatrix} \\ &= \sigma(Z^{[1]}) \\ &= \sigma({W^{[1]}}^{T}X+ B^{[1]}) \end{aligned}\]3. Output Layer
Output Layer는 다음과 같이 정의된다.
\[\begin{aligned} \hat{Y} &= \begin{bmatrix} \hat{y_{0}} & \hat{y_{1}} & \hat{y_{2}} & \hat{y_{3}} \end{bmatrix} \\ &= \sigma(Z^{[2]}) \\ &= \sigma({W^{[2]}}^{T}H+ B^{[2]}) \end{aligned}\]4. Loss
정답 집합인 \(Y\)는 다음과 같이 정의된다.
\[Y = \begin{bmatrix} y_{0} & y_{1} & y_{2} & y_{3} \end{bmatrix}\]최종 Loss는 다음과 같다.
\[\mathcal{L}=\frac{1}{4} \Sigma_{i} - \{ y \log{\hat{y}} + (1-y)\log(1-\hat{y}) \}\]Gradient Descent를 위한 변수별 편미분값
위에서 제시한 각 Parameter의 Loss값에 대한 편미분을 구하면 다음과 같다. \(\begin{aligned} \frac{\partial \mathcal{L}}{\partial W^{[2]}}&=H(\frac{\partial \mathcal{L}}{\partial z^{[2]}})^{T}\\ &=H(\hat{Y}-Y)^{T} \\\\ \frac{\partial \mathcal{L}}{\partial B^{[2]}}&=(\hat{Y}-Y)\\\\ \frac{\partial \mathcal{L}}{\partial H} &=\frac{\partial \mathcal{L}}{\partial z_{0}^{[2]}}W^{[2]}\\ &=W^{[2]}(\hat{Y}-Y) \\\\ \frac{\partial \mathcal{L}}{\partial W^{[1]}} &= x (\frac{\partial \mathcal{L}}{\partial z^{[1]}})^T \\ &= x (\frac{\partial \mathcal{L}}{\partial H} \odot H \odot (\begin{bmatrix} 1 \\ 1 \end{bmatrix} -H))^T \\\\ \frac{\partial \mathcal{L}}{\partial B^{[1]}} &= \frac{\partial \mathcal{L}}{\partial z^{[1]}}\\ &=\frac{\partial \mathcal{L}}{\partial H} \odot H \odot (\begin{bmatrix} 1 \\ 1 \end{bmatrix} -H) \end{aligned}\)
이 모든 수식의 유도 과정은 Multi-Layer-Neural Network 이론편에서 다루었으니 참조!
Python-NumPy 코드로 나타내기
이전 포스트의 ‘Advanced: 행렬(Matrix) 연산으로 바꾸기‘에서 다루었다시피, for loop을 최대한 배제하고 Matrix 연산으로 파라미터를 최적화하는 것이 더 효율적이다. 이에 따라 이번 챕터에서는 행렬연산 기반으로 Loss Function을 디자인하고, 이를 parameter update rule 또한 행렬연산 기반으로 도출해보자.
1. Input Data 및 Lable을 행렬로 표현하기
각각의 열벡터를 옆으로 쌓아서 전체 인풋 데이터 \(X\)를 다음과 같이 만든다.
\[X = \begin{bmatrix} x_{0} & x_{1} & x_{2} & x_{3} \end{bmatrix} = \begin{bmatrix} x_{00} & x_{01} & x_{02} & x_{03} \\ x_{10} & x_{11} & x_{12} & x_{13} \\ \end{bmatrix} = \begin{bmatrix} 0 & 0 & 1 & 1 \\ 0 & 1 & 0 & 1 \\ \end{bmatrix}\]마찬가지 방법으로 \(Y\)를 만들어보자.
\[Y = \begin{bmatrix} y_{0} & y_{1} & y_{2} & y_{3} \end{bmatrix} = \begin{bmatrix} 0 & 1 & 1 & 0 \end{bmatrix}\]이를 파이썬 코드로 그대로 옮겨보자.
import numpy as np

X = np.array([0, 0, 1, 1, 0, 1, 0, 1]).reshape(2,4)
Y = np.array([0, 1, 1, 0]).reshape(1,4)

print(X)
print(Y)
[[0 0 1 1]
 [0 1 0 1]]
[[0 1 1 0]]
2. 파라미터 초기화
다음 파이썬 코드와 같이 모든 파라미터를 0 벡터 내지는 0 행렬로 초기화해보자.
def init_parameters (num_hidden=2):
    W1 = np.zeros((2,num_hidden))
    B1 = np.zeros((num_hidden,1))
    W2 =  np.zeros((num_hidden,1))
    B2 = np.zeros((1,1))
    return W1, B1, W2, B2

W1, B1, W2, B2 = init_parameters()
3. Hidden Layer 행렬로 표현하기
Hidden Layer는 다음과 같이 정의된다.
\[\begin{aligned} H &= \begin{bmatrix} h_{00} & h_{01} & h_{02} & h_{03} \\ h_{10} & h_{11} & h_{12} & h_{13} \end{bmatrix} \\ &= \sigma(Z^{[1]}) \\ &= \sigma({W^{[1]}}^{T}X+ B^{[1]}) \end{aligned}\]이를 파이썬 코드로 나타내보자.
def affine (W, X, B):
    return np.dot(W.T, X) + B

def sigmoid (o):
    return 1./(1+np.exp(-1*o))

Z1=affine(W1,X,B1)
H=sigmoid(Z1)
print(H)
[[0.5 0.5 0.5 0.5]
 [0.5 0.5 0.5 0.5]]
4. Output Layer
Output Layer는 다음과 같이 정의된다.
\[\begin{aligned} \hat{Y} &= \begin{bmatrix} \hat{y_{0}} & \hat{y_{1}} & \hat{y_{2}} & \hat{y_{3}} \end{bmatrix} \\ &= \sigma(Z^{[2]}) \\ &= \sigma({W^{[2]}}^{T}H+ B^{[2]}) \end{aligned}\]이를 파이썬 코드로 표현해보자.
Z2 = affine(W2,H, B2)
Y_hat = sigmoid(Z2)
print(Y_hat)
[[0.5 0.5 0.5 0.5]]
5. Loss 구하기
마지막으로 Loss Function을 행렬로 구해보자. Loss function의 정의는 Logistic Regression과 같다.
최종 Loss는 다음 수식과 같다.
\[\mathcal{L}=-\frac{1}{4} \sum_{i} \{ y \log{\hat{y}} + (1-y)\log(1-\hat{y}) \}\]이를 파이썬 코드로 나타내보자.
def loss_eval (_params):

    W1, B1, W2, B2 = _params

    # Forward: input Layer
    Z1 = affine(W1, X, B1)
    H  = sigmoid(Z1)

    # Forward: Hidden Layer
    Z2 = affine(W2, H, B2)
    Y_hat = sigmoid(Z2)

    loss = 1./X.shape[1] * np.sum(-1 * (Y * np.log(Y_hat) + (1-Y) * np.log(1-Y_hat)))
    return Z1, H, Z2, Y_hat, loss

loss_eval ([W1, B1, W2, B2])[-1]
0.6931471805599453
6. Loss에 대한 parameter 별 편미분을 이용한 prarameter update rule 표현
아까 구한 편미분 값을 이용하여 다음 parameter update rule을 파이썬 코드로 표현해보자.
\[\begin{aligned} W^{[2]} &\leftarrow W^{[2]} - \eta \frac{\partial \mathcal{L}}{\partial W^{[2]}}\\ B^{[2]} &\leftarrow B^{[2]} - \eta \frac{\partial \mathcal{L}}{\partial B^{[2]}}\\ W^{[1]} &\leftarrow W^{[1]} - \eta \frac{\partial \mathcal{L}}{\partial W^{[1]}}\\ B^{[1]} &\leftarrow B^{[1]} - \eta \frac{\partial \mathcal{L}}{\partial B^{[1]}} \end{aligned}\]먼저 gradient 부터 구해보자.
def get_gradients (_params):

    W1, B1, W2, B2 = _params
    m = X.shape[1]

    Z1, H, Z2, Y_hat, loss = loss_eval([W1, B1, W2, B2])

    # BackPropagate: Hidden Layer
    dW2 = np.dot(H, (Y_hat-Y).T)
    dB2 = 1. / 4. * np.sum(Y_hat-Y, axis=1, keepdims=True)
    dH  = np.dot(W2, Y_hat-Y)

    # BackPropagate: Input Layer
    dZ1 = dH * H * (1-H)
    dW1 = np.dot(X, dZ1.T)
    dB1 = 1. / 4. * np.sum(dZ1, axis=1, keepdims=True)

    return [dW1, dB1, dW2, dB2], loss
BackPropagation을 통한 Multi-Layer Neural Network 훈련하기
Running Rate \(\eta\)가 0.1일 때 1000번의 iteration동안 학습시켜보자.
def optimize (_params, learning_rate = 0.1, iteration = 1000, sample_size = 0):

    params = np.copy(_params)

    loss_trace = []

    for epoch in range(iteration):

        dparams, loss = get_gradients(params)

        for param, dparam in zip(params, dparams):
            param += - learning_rate * dparam

        if (epoch % 100 == 0):
            loss_trace.append(loss)

    _, _, _, Y_hat_predict, _ = loss_eval(params)

    return params,loss_trace, Y_hat_predict
어디 한번 돌려보자!
params = init_parameters(2)
new_params, loss_trace, Y_hat_predict = optimize(params, 0.1, 100000, 0)
print(Y_hat_predict)
print(new_params)
[[0.5 0.5 0.5 0.5]]
[array([[0., 0.],
       [0., 0.]]) array([[0.],
       [0.]])
 array([[0.],
       [0.]]) array([[0.]])]
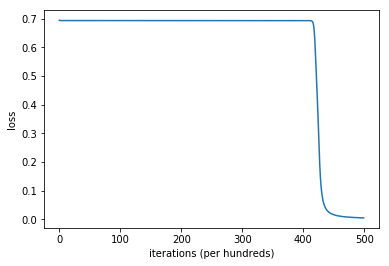
확인차 로스가 어떻게 변하는지 코스트를 그려보자.
import matplotlib.pyplot as plt

# Plot learning curve (with costs)
plt.plot(loss_trace)
plt.ylabel('loss')
plt.xlabel('iterations (per hundreds)')
plt.show()

정말 코스트 함수가 아예 변하지 않았다. 무엇이 문제일까?
모든 파라미터를 0으로 초기화한 것이 문제이다. 이는 And Gate 실습시 문제가 되지 않았던 부분이나, XOR Gate를 학습할때는 문제가 된다.
Exercise: 왜 그러한가?
Sol: Parameter를 random 초기화하면 이 문제를 해결할 수 있다.
def init_random_parameters (num_hidden = 2, deviation = 1):

    W1 = np.random.rand(2,num_hidden)*deviation
    B1 = np.random.random((num_hidden,1))*deviation
    W2 = np.random.rand(num_hidden,1)*deviation
    B2 = np.random.random((1,1))*deviation
    return W1, B1, W2, B2

init_random_parameters ()
(array([[0.31408552, 0.91564208],
        [0.60754139, 0.59415686]]), array([[0.22435047],
        [0.54923224]]), array([[0.19294095],
        [0.97963762]]), array([[0.29476686]]))
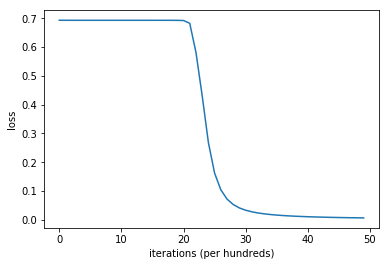
params = init_random_parameters(2, 0.1)
new_params, loss_trace, Y_hat_predict = optimize(params, 0.1, 100000)
print(Y_hat_predict)
# Plot learning curve (with costs)
plt.plot(loss_trace)
plt.ylabel('loss')
plt.xlabel('iterations (per hundreds)')
plt.show()
[[0.00320744 0.997725 0.99772495 0.002362 ]]

(Advanced) tanh 사용하기
Hidden Layer에서는 sigmoid 함수보다 tanh 함수를 사용하는 것이 일반적으로 더 좋은 성능을 낸다고 알려져있다. 실험해보자
Exercise: 왜 그런가?
먼저 tanh 함수의 모양부터 살펴보자.
\[\begin{aligned} \tanh(x) &= \frac{e^{x}-e^{-x}}{e^{x}+e^{-x}} \end{aligned}\\ \begin{aligned} \frac{d \tanh(x)}{dx} &= 1-{\tanh}^{2}(x) \end{aligned}\\\]이다.
def tanh(x):
    ex = np.exp(x)
    enx = np.exp(-x)
    return (ex-enx)/(ex+enx)

def loss_eval_tanh (_params):

    W1, B1, W2, B2 = _params

    # Forward: input Layer
    Z1 = affine(W1, X, B1)
    H  = tanh(Z1)

    # Forward: Hidden Layer
    Z2 = affine(W2, H, B2)
    Y_hat = sigmoid(Z2)

    loss = 1./X.shape[1] * np.sum(-1 * (Y * np.log(Y_hat) + (1-Y) * np.log(1-Y_hat)))
    return Z1, H, Z2, Y_hat, loss

def get_gradients_tanh (_params):

    W1, B1, W2, B2 = _params

    Z1, H, Z2, Y_hat, loss = loss_eval_tanh([W1, B1, W2, B2])

    # BackPropagate: Hidden Layer
    dW2 = np.dot(H, (Y_hat-Y).T)
    dB2 = 1./4. * np.sum(Y_hat-Y, axis=1, keepdims=True)
    dH  = np.dot(W2, Y_hat-Y)

    # BackPropagate: Input Layer
    dZ1 = dH * (1 - (H * H)) # <- Changed!
    dW1 = np.dot(X, dZ1.T)
    dB1 = 1./4. * np.sum(dZ1, axis=1, keepdims=True)

    return [dW1, dB1, dW2, dB2], loss

def optimize_tanh (_params, learning_rate = 0.1, iteration = 1000, sample_size = 0):

    params = np.copy(_params)

    loss_trace = []

    for epoch in range(iteration):

        dparams, loss = get_gradients_tanh(params)

        for param, dparam in zip(params, dparams):
            param += - learning_rate * dparam

        if (epoch % 100 == 0):
            loss_trace.append(loss)

    _, _, _, Y_hat_predict, _ = loss_eval_tanh(params)

    return params,loss_trace, Y_hat_predict
params = init_random_parameters(2, 0.1)
new_params, loss_trace, Y_hat_predict = optimize_tanh(params, 0.1, 5000)
print(Y_hat_predict)
print(loss_trace[-1])
# Plot learning curve (with costs)
plt.plot(loss_trace)
plt.ylabel('loss')
plt.xlabel('iterations (per hundreds)')
plt.show()
[[0.00237952 0.99872297 0.99872298 0.00248596]]
0.001868090554160822

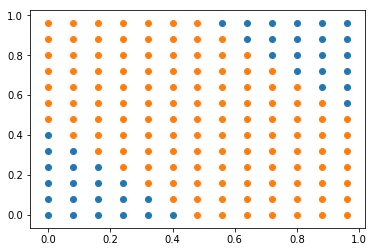
이번에는 이런 그래프를 그려보자!
W1_new, B1_new, W2_new, B2_new = new_params

X1 = np.arange(0, 1, 0.08)
X2 = np.arange(0, 1, 0.08)
neg_plot_X = []
neg_plot_Y = []
pos_plot_X = []
pos_plot_Y = []

for x_1 in X1:
    for x_2 in X2:

        H = tanh(affine(W1_new, np.array([x_1, x_2]).reshape(2,1), B1_new))
        Y_ = sigmoid(affine(W2_new, H, B2_new))
        if( Y_ < float(0.5)):
            neg_plot_X.append(x_1)
            neg_plot_Y.append(x_2)
        else:
            pos_plot_X.append(x_1)
            pos_plot_Y.append(x_2)


plt.scatter(neg_plot_X, neg_plot_Y)
plt.scatter(pos_plot_X, pos_plot_Y)
<matplotlib.collections.PathCollection at 0x2c825f9acf8>
